FARMHOUSE REDUX – STAIR REMODEL

Chris Kryzanek Architect - Farmhouse Redux - Stair remodel schematic design

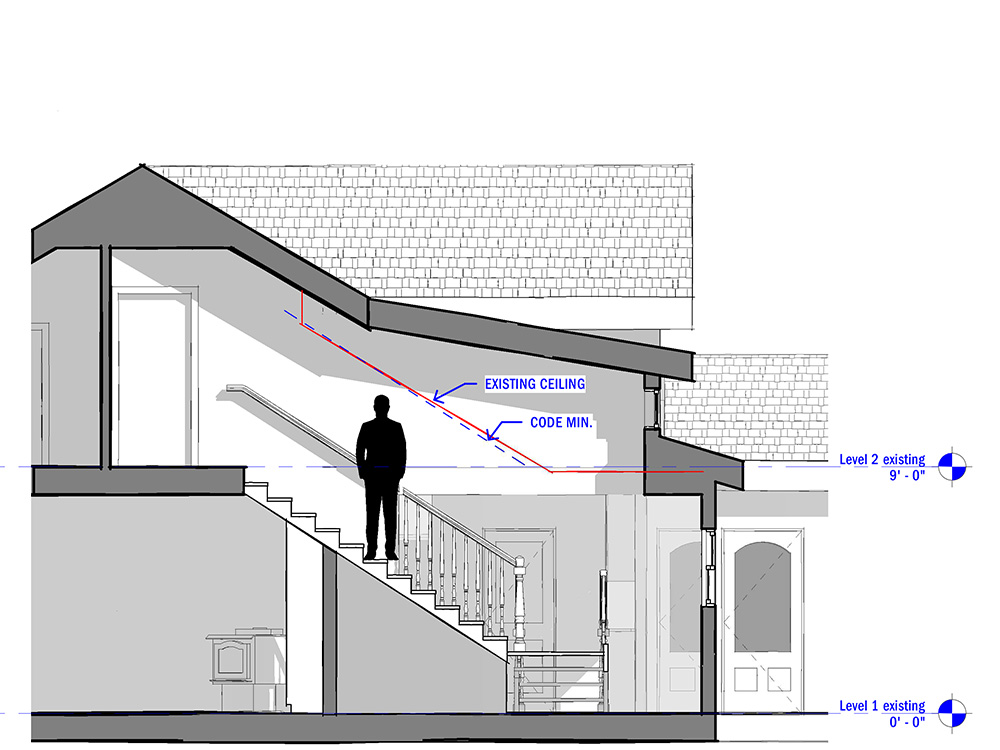
After looking at the upstairs remodel we move to the stairway. A couple of primary issues with the existing stairs are as follows:

  • Tread depth and riser height are outdated.
  • Headroom barely at code level (6’-8”).
  • The landing is located next to an existing bathroom door.
  • Overall dark and cramped feeling.

Usually in a remodel, modifying an existing stair can be met with challenges. The new design might have a different slope than the existing ceiling leading to the headroom not meeting the building code. A remodel that excludes the existing stairs will not require it to meet the current building code. Any stair that is modified will be required to meet the current building code.

Another issue that can arise if the tread depths are increased is the overall length of the stair might not fit the existing stairway space. Also, modifying the upper floor landing can result in running into existing pipes or ducts.
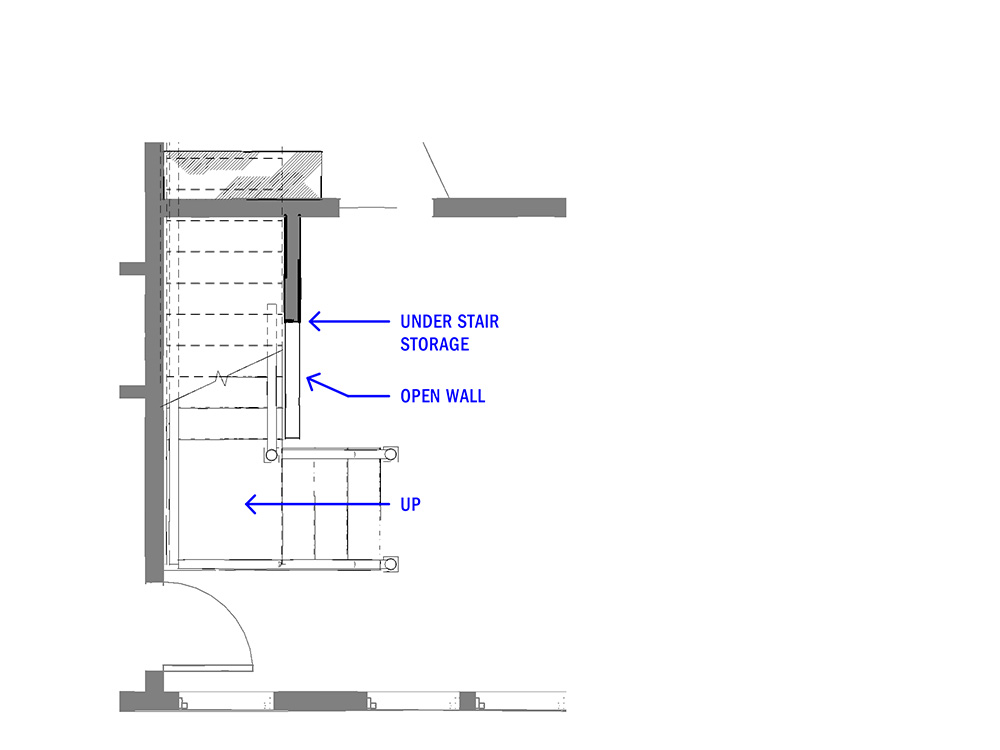
Chris Kryzanek Architect - Farmhouse Redux - Stair remodel schematic design plan

On this project, the existing upper floor landing is maintained. For the stair layout, an intermediate landing is added so that the stairway turns and meets the remodeled circulation space on the lower floor.
Chris Kryzanek Architect - Farmhouse Redux - stair design structural framing at the preliminary stage

Going from the landing to the lower level, this section shows how a potential issue with headroom is addressed with a creative structural solution. At this point, it’s still preliminary, but the main point is that working with structural engineers in the past, it’s good to show your design intent when getting the discussion going.

The upper floor addition impacts the existing roof substantially, so a change to the roof over the stairs makes sense and is used to increase headroom. In the section view, the shed dormer helps explain the increased headroom, also showing an upper window added to provide more daylight into the stairway.
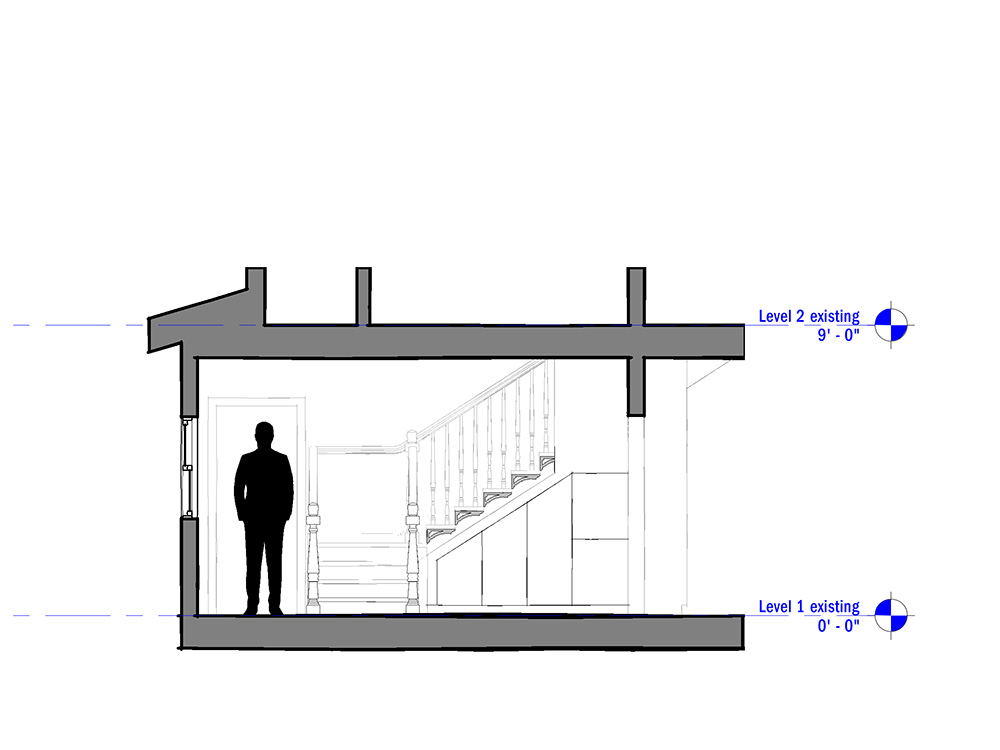
Chris Kryzanek Architect - Farmhouse Redux - stair design details historic Federal and Colonial

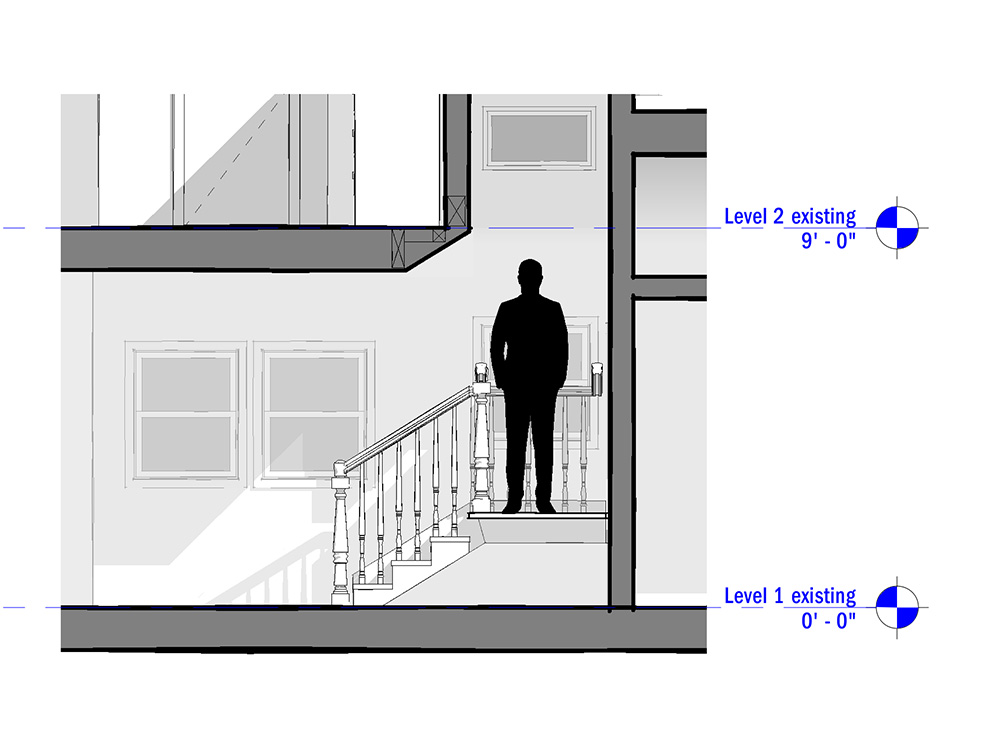
The second section view reveals more details of the stairway. Opening up the wall before the intermediate landing allows more of a connection (and daylight).

Details reference historic Federal and Colonial designs in the new stair railing, balusters & newell posts. Stair brackets reflect exterior existing details on the house. The wall also now incorporates slide-out storage.

This helps turn the previous stairway into a design element, making it a visible focus point from the new entry on the lower level remodel.

FARMHOUSE REDUX – UPPER FLOOR SCHEMATIC DESIGN

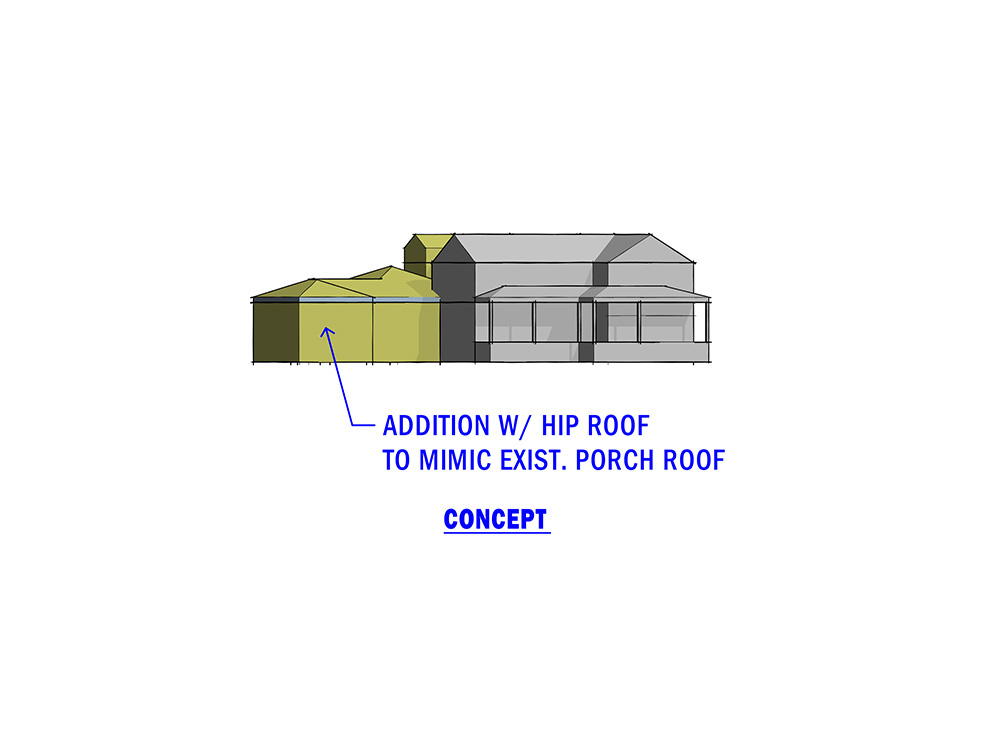
The schematic design concept for this project starts from the top down. Because the goal of an addition is not to clash with the existing house, the roof is often a controlling factor. The massing study’s form was based on the existing roof slope and ridge height.

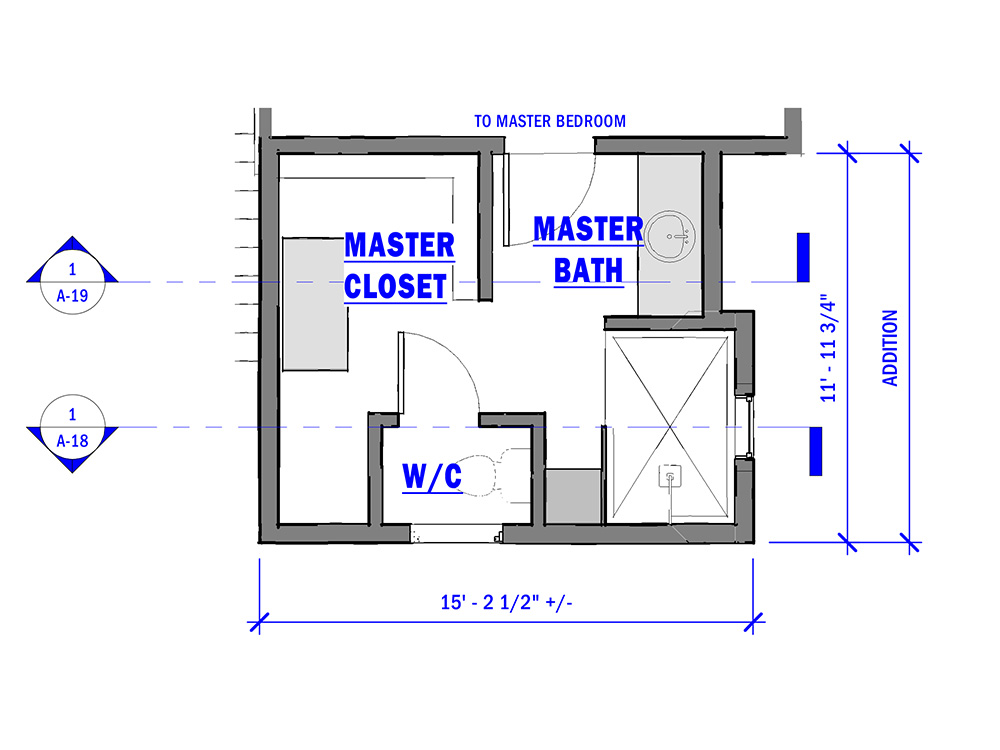
Schematic upper-floor plan for master bathroom & master closet.

SCHEMATIC UPPER-LEVEL FLOOR PLAN

The floor plan shows the new vanity with sink, shower, toilet room, and master closet. This works for meeting project goals for the master bedroom. This partial floor plan only tells part of the story. To truly understand the design concept a section view is equally useful. 

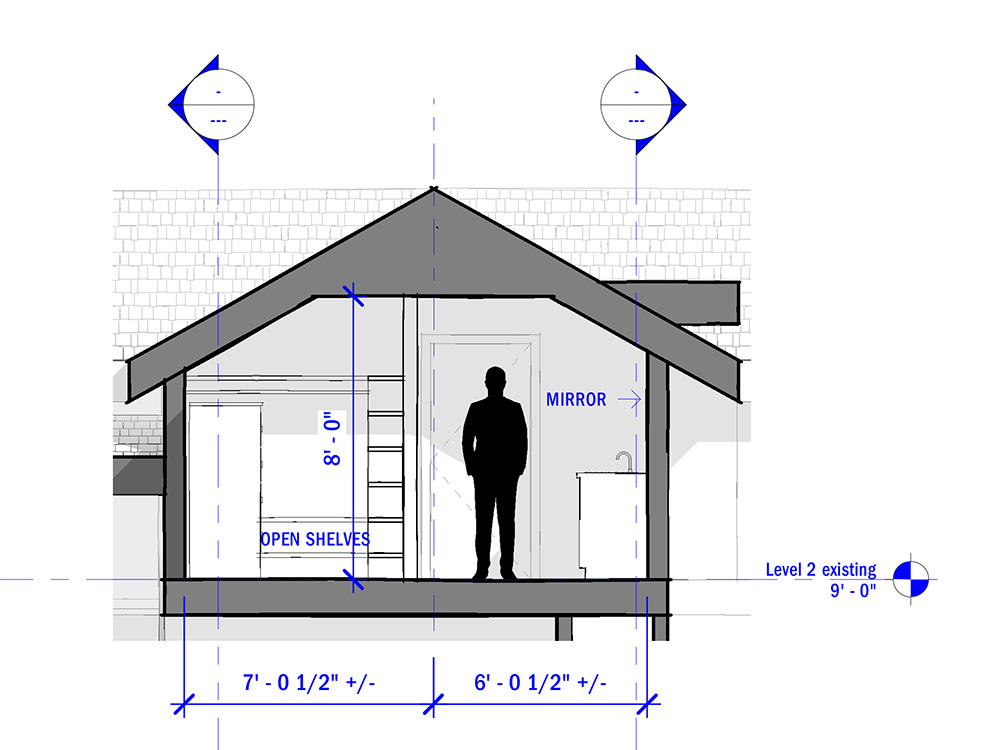
Schematic section upper-floor master bathroom and master closet

SCHEMATIC UPPER-LEVEL SECTION AT VANITY

The existing roof framing uses a short plate height for the roof rafters. This means the existing upper-floor rooms all have sloping ceilings on walls that support the sloping roof. The addition has similar sloping walls. The addition uses this to its advantage with the lower-height walls used for the vanity mirror and back wall of the closet.

The vanity mirror has a top height of around 6′-0″, which is still at an acceptable height. The closet allows the lower-height wall to be used for a dresser or a sitting bench for dressing.

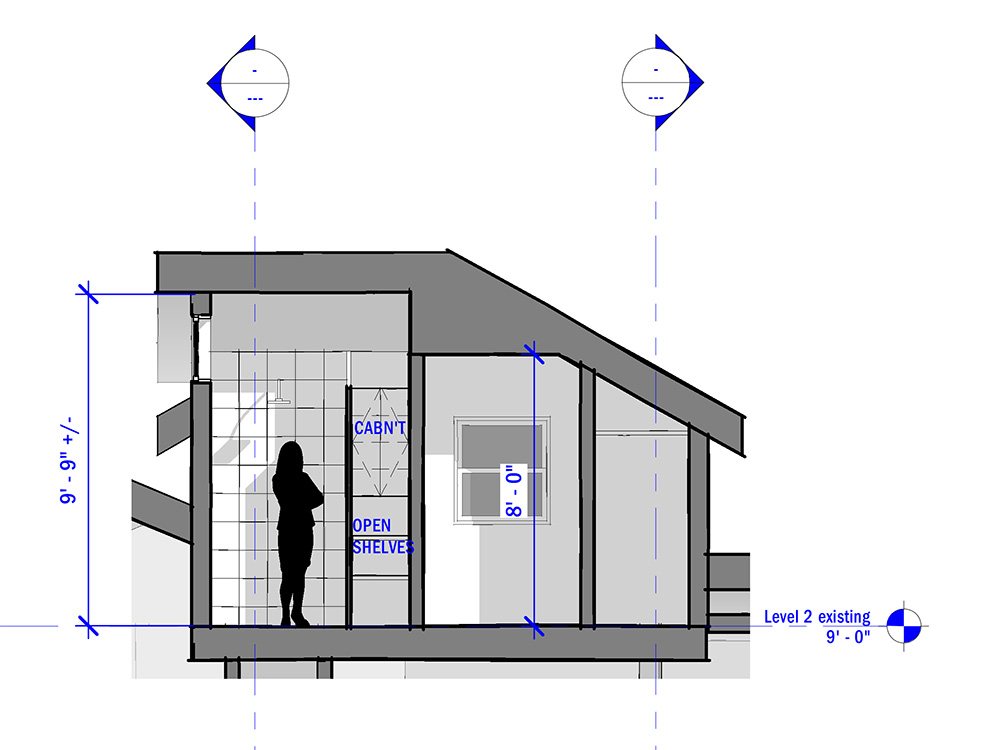
Schematic section upper-floor master bathroom shower

SCHEMATIC UPPER-LEVEL SECTION AT SHOWER

The shower wall expands further out than the vanity wall, and this is accomplished using a dormer to provide a more generous ceiling height and an upper window for daylight and privacy. A built-in cabinet adjacent to the shower also provides storage space for bathing accessories and shelves below for towels.

Next up:

ARCHITECTURAL SITE ANALYSIS

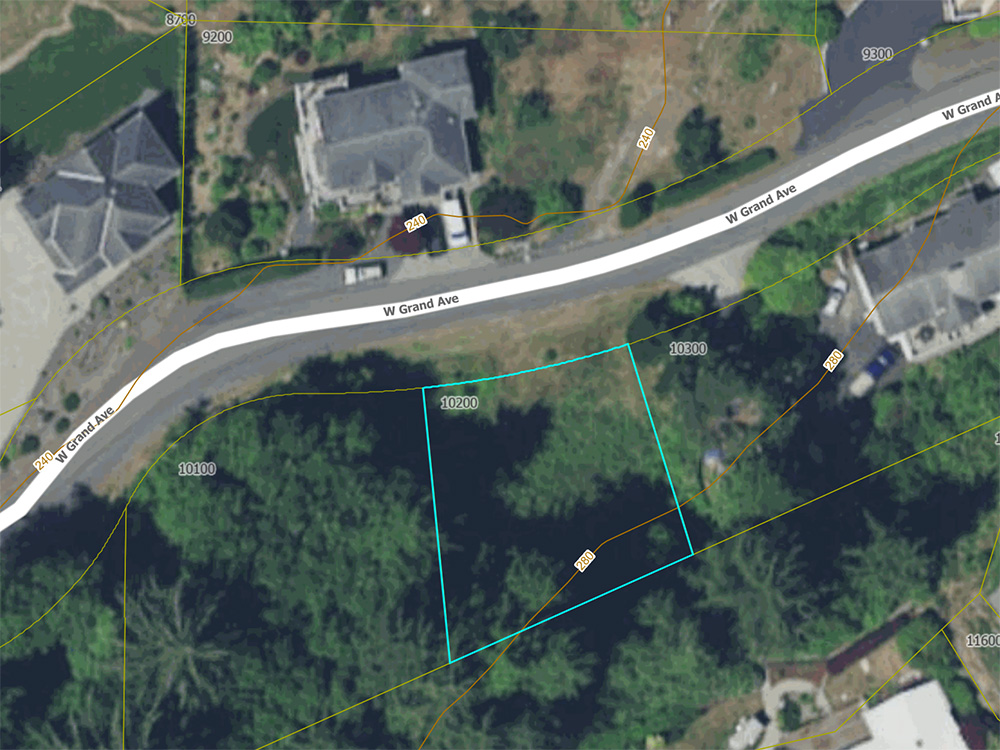
Architectural site analysis of Astoria Oregon lot on Grand Ave

Often when a client is looking to purchase a lot (or already has a lot) a pre-design step I take is providing a site analysis. The major point of this is to look at site constraints and opportunities which can help to see if it’s a good fit for the proposed project’s scope. For this step in the process, I will use an actual lot for sale in Astoria to explain my process.

This lot is located along Grand Ave West, which features one of Astoria’s iconic views looking toward the Megler Bridge.

When I visit a potential site with a client it’s primarily to find out what they love about it. Of course, it’s also a time to look for opportunities and possible challenges. I did a quick visit to this site for further understanding beyond just the property lines and aerial view of the site conditions.

Some observations:

  • The lot’s grade is lower than the adjacent developed property, as well as the rear yard which steeply slopes up.
  • There is a lot of dense foliage surrounding the relatively flat lot. 
  • Limited solar exposure through foliage.
  • Natural buffer from storm winds.

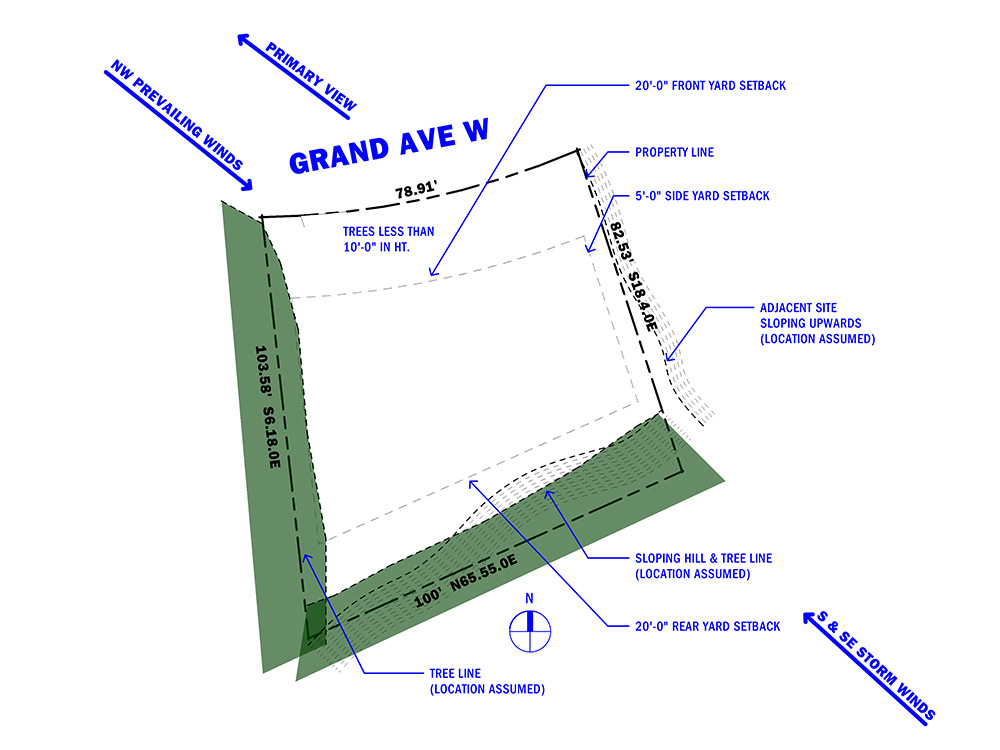
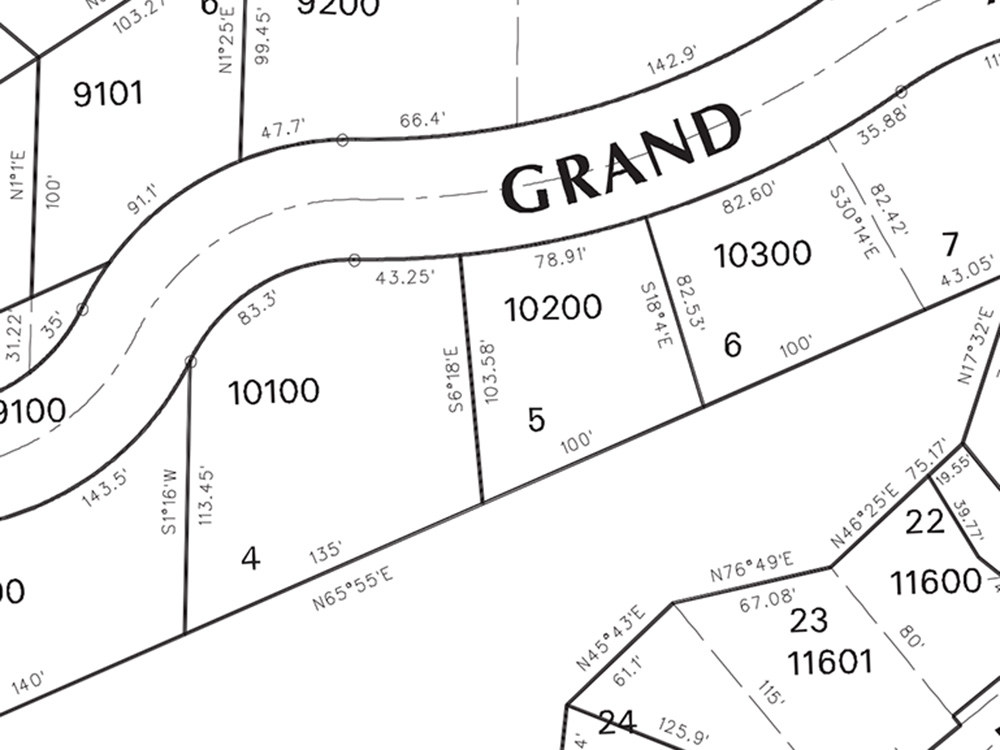
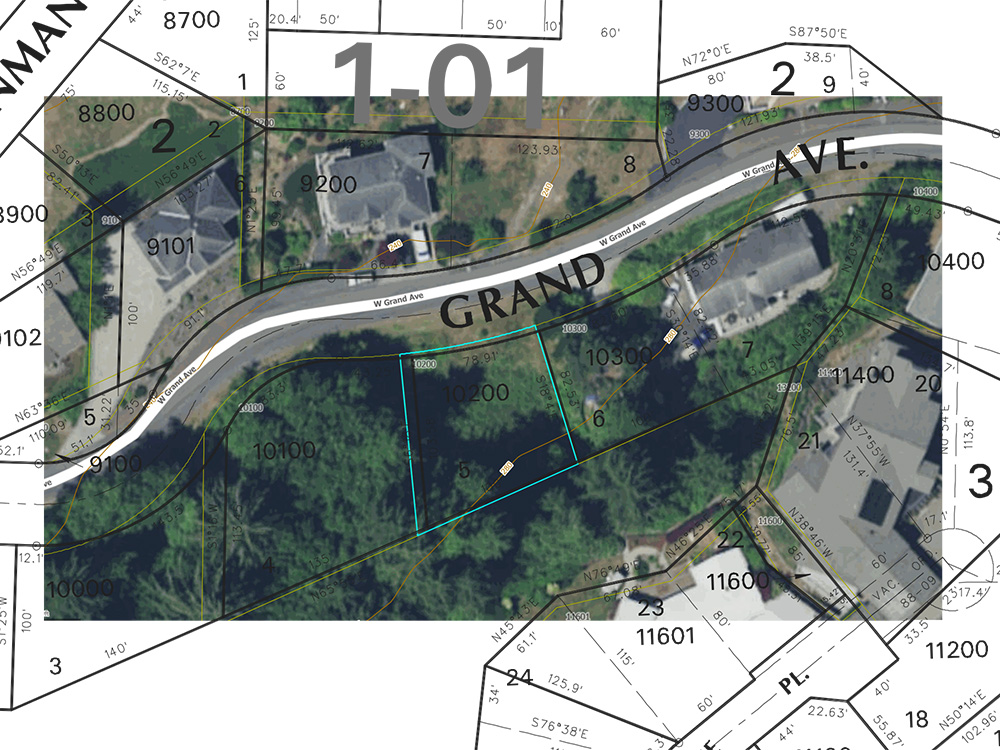
Prior to having a survey done on the lot (which is a necessary process once the lot is selected), there are a few steps I take in my site analysis to use accurate numbers. First, using Clatsop County’s GIS (Geographic Information Systems) database on tax lots, I can get some info about the lot (primarily the actual property lines). On the website, there is a boundary survey from 1990 for the lot as well.

Overlaying this with the aerial view, there are some differences. This reiterates the need for a survey.

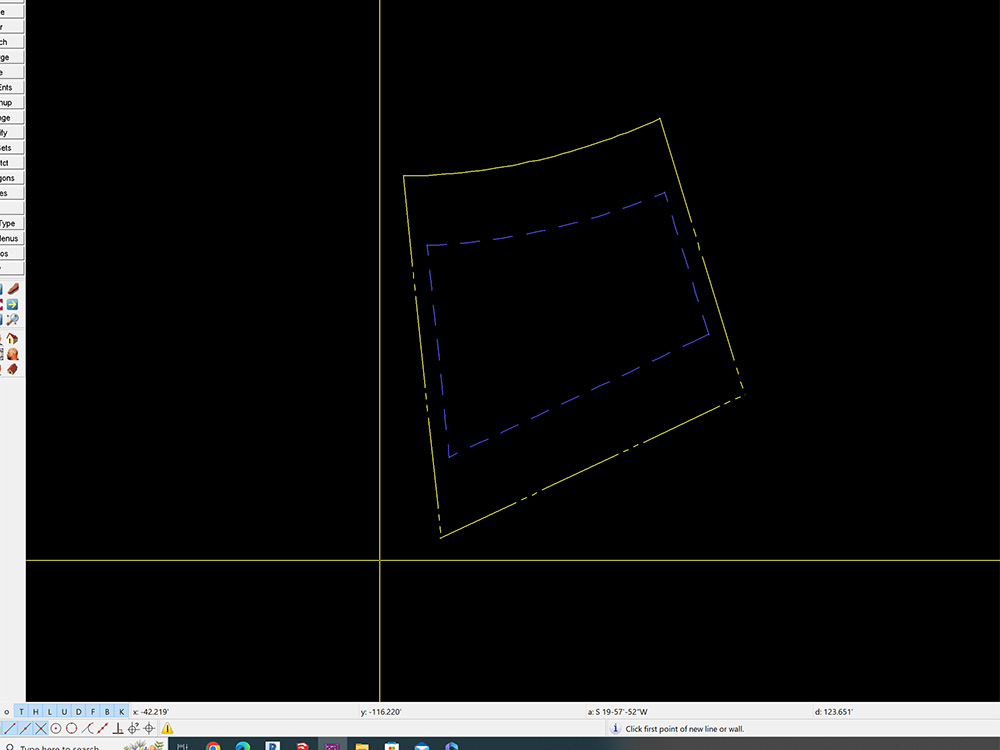
Astoria’s Development Code for R-1 (Low Density Residential Zone), provides the following restrictions: minimum front yard setback is 20 feet, the side 5 feet, and rear 20 feet. The height limitation is 28 feet above grade.

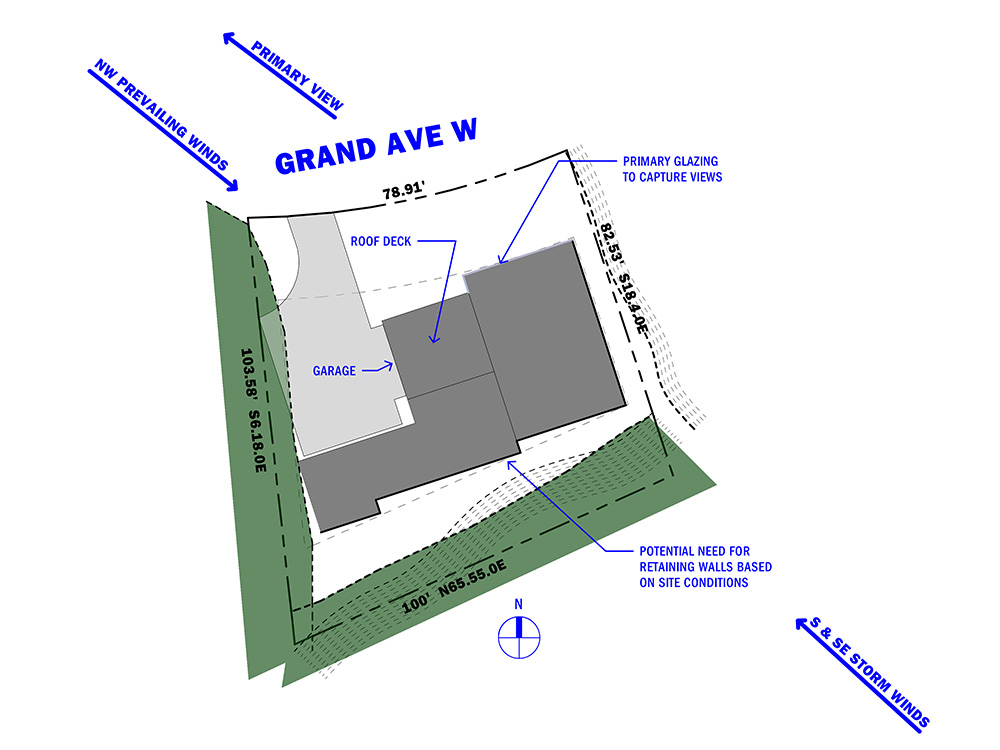
From this information, using CAD I created a basic site using the property line lengths and bearings. The setbacks were then added from the Development Code. What this site plan lacks is accurate contours and major vegetation. On this site, that information is important for the exact location of foliage in relation to the property lines, however, it is still useful for pre-design analysis.

The benefit of this basic site plan is that an early design program can be tested. Roughly how much square footage is available on grade level (factoring in a driveway, etc) can be determined. Given that the lot sits lower in elevation, primary view considerations might need to be positioned on a second floor.

Here a schematic building footprint is shown. In this early concept, rather than a street-facing garage, it is turned with driveway space to maneuver. This would allow the smaller lot and street-facing side not to be dominated by the garage door.

On the preliminary plan, the heavy black lines indicate possible locations where retaining walls might be required. On the front of the plan, the blue-grey lines indicate glazing. This would be similar on both levels. Another thought would be a roof deck since the site limits development on the rear yard side.

While this goes beyond just site analysis, it helps to explore possibilities with the site and see if those work within the client’s needs.

FARMHOUSE REDUX PROGRAM & MASSING SCHEMATICS

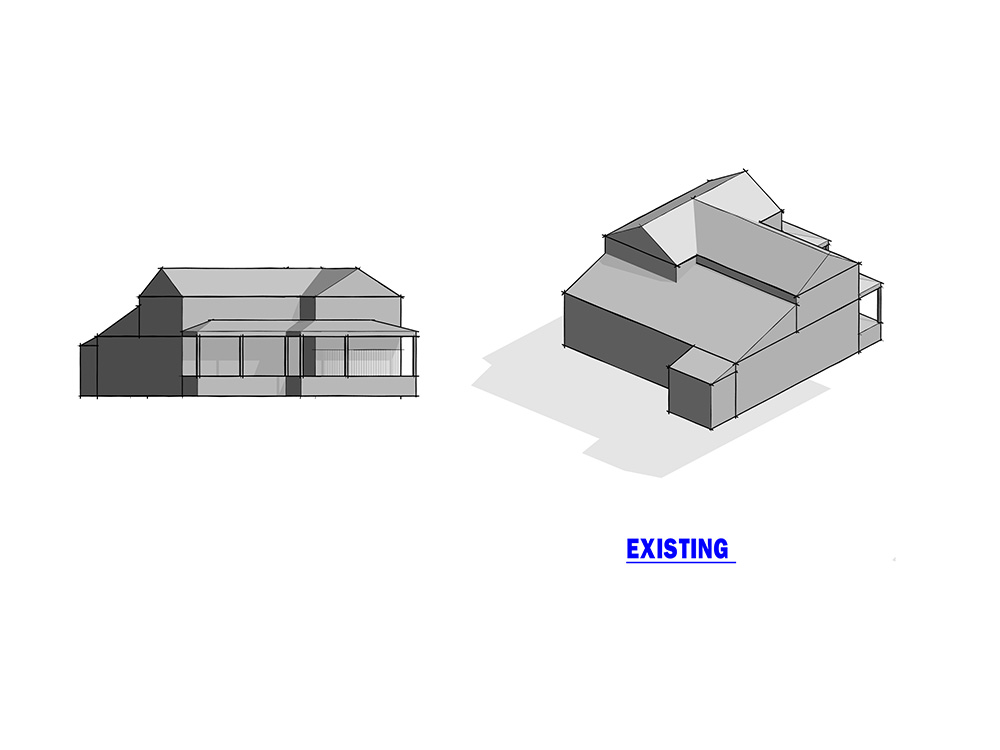
Architectural 3D massing of existing residence

It’s common in older homes to have only one bathroom for any family which is not ideal. A solution to that problem can sometimes be addressed by adding a small powder room into a creative location. On this project, the aging house has found itself having multiple issues besides the single bathroom. For the remodel goals, here’s the general breakdown:

  • The primary entrance to the house is not the formal entrance, which creates some confusion with guests.
  • The kitchen serves triple duty as the entry point, dining space, and functional kitchen.
  • The outdated kitchen lacks needed outlets, dated lighting, and proper hood ventilation. 
  • Laundry room is cramped and lacks a utility sink.
  • Stairway is constrictive with an awkward landing outside the bathroom door. Opening the door impacts the circulation path.
  • Master bedroom closet is small with a very short access door.
  • Need for utility room with space for extra fridge and freezer. 
  • Heating is not adequate in the upstairs bedrooms except the master bedroom.
  • Overall lighting is dated.

Goals of the remodel / addition were as follows:

  • Don’t overwhelm the existing street side portion of the existing house with an addition.
  • Improve overall circulation paths
  • Have the concept address most or all of the current issues.
  • Preliminary program budget goals of approximately 750 square feet for the addition + additional remodel areas.

CONCEPT

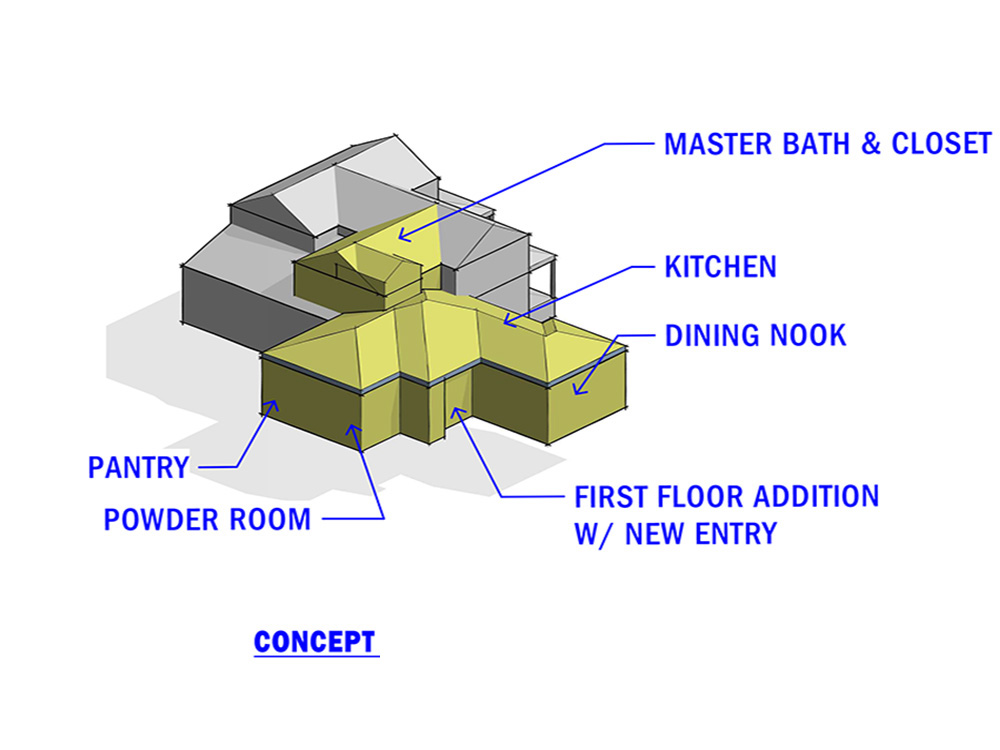
The concept proposes additions on both the first and second floors.

Architectural design concept 3D massing

This concept starts with the second-floor addition (around 200 square feet) from the existing master bedroom. A new master bath and closet are added here. First off, with the addition cutting into the existing roof the goal is to match the existing ridge height and roof slope. On the existing house the challenge is that the spring line for the roof framing is around 6′-0″. If the addition uses a typical plate height of 8′-0″, it means that the addition will have to be narrower to have matching ridge heights. What this also means with a 6′-0″ plate height is that the ceiling is low on the walls that have the sloping roof and therefore aspects of the addition put in those locations have to reflect that. In the massing study, there is an additional portion on the side that is needed to accommodate a shower with adequate headroom (in this massing concept it is more bulky than a later refined dormer). Also, because this goes over the existing kitchen ceiling it will require new floor framing and structural support. The existing stair is reworked to update to a modern tread depth and a new landing is moved away from the existing bathroom door.

On the first floor, the addition (around 600 square feet) provides for a new kitchen and dining nook. A new entry provides a better dropoff point with a new coat closet, shoe bench, and adjacent powder room. The pantry is moved and the laundry room is reworked in its existing location. The overall circulation path is greatly improved and further other existing doors and openings would be addressed.

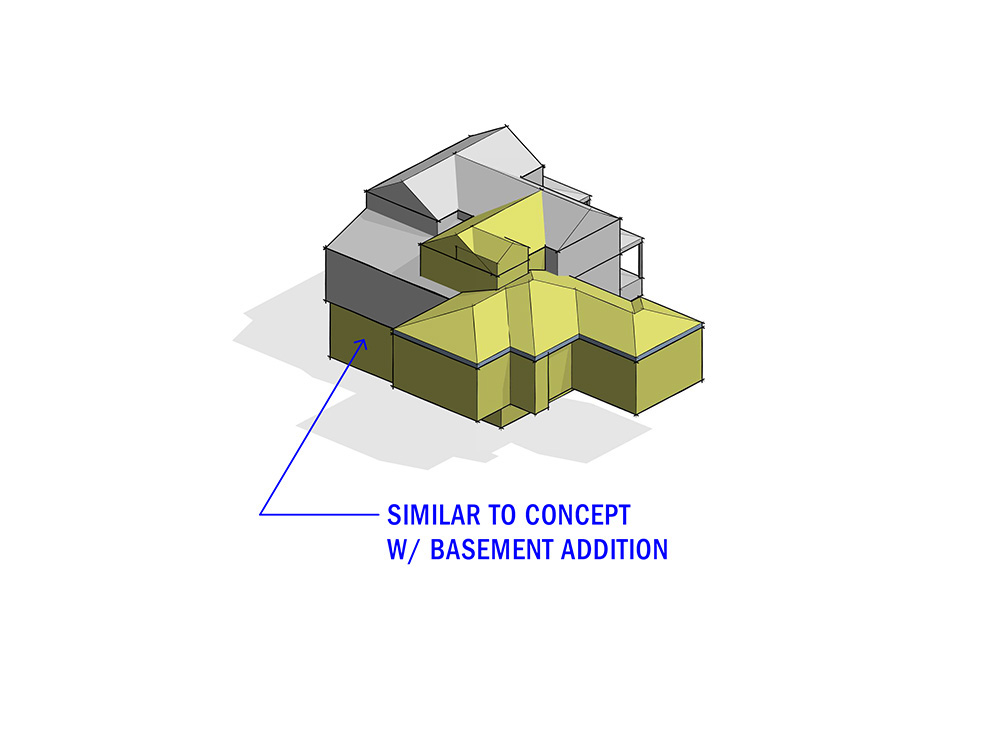
CONCEPT W/ ADDITIONAL BASEMENT

A potential option for additional square footage with the addition of a basement.

Architectural schematic design massing concept 3D

This version of the concept addresses the concern of an aging foundation and the possible benefit of replacing it while incorporating additional square footage. There is an extra cost in construction for a complete foundation replacement rather than underpinning existing points in the foundation or new sections where new structural loads are created. With most additions there is a factor of uncertainty in the existing construction that has to be verified and sometimes aspects of that can’t be discovered until work is underway.

Side note, this is a reason why the Construction Administration fee is addressed on an hourly basis.

With the basement option discussion opened up, it allows the possibility of having bidding alternates in the future design documents and also can be used to create rough preliminary budget numbers to work with early on.

Next up:

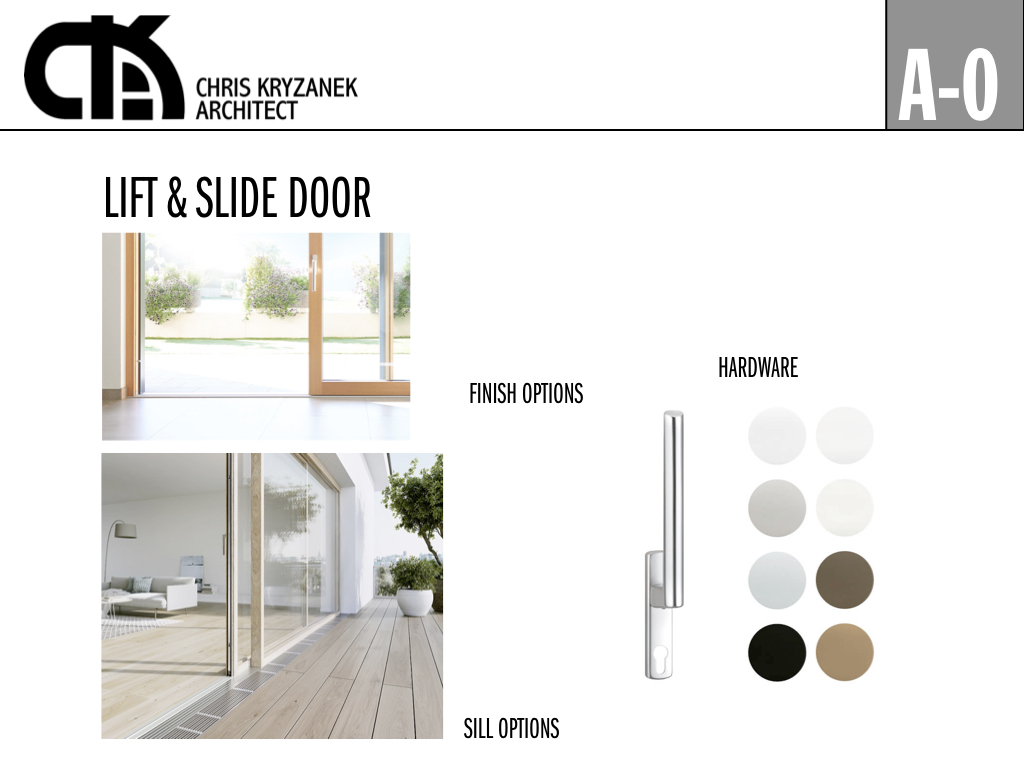
LIFT & SLIDE DOORS

If your only experience with patio doors is older sliding models, stepping up to a lift and slide door is a massive upgrade regarding operation and performance. 

The hardware in lift-slide systems is much more robust and allows the door in the lifted position to glide effortlessly. In the locked position, it drops and is extra secure and weather-sealed. An integrated soft close function can further enhance operation with a safety feature to ensure a soft close that prevents injury or damage. With better performing glazing it also makes these great for maximizing the energy performance of your house which leads to better overall comfort.

These doors are available in similar finishes as windows (wood, aluminum, and UPVC. While they can have flush sills and a high wind exposure rating, it does make sense to provide roof overhangs still to protect them from the onslaught of coastal rain that we experience here in the Northern Coastal range of Oregon.

Lift and slide doors are custom-designed to your projects’ requirements. Typically they feature an operable panel and fixed section, which can be quite large. Usually, if the operable section gets to be bigger than 4 ft the weight can be substantial, and even if the operation is effortless, installation can be more of a challenge.

Overall, if your dream custom residence features an amazing view of the Columbia River, The Megler Bridge, or an ocean seascape, you should maximize it. This product is a great way to have a functional door that has amazing optics, performance, and ease of use and will give you maximum glazing.

PROGRAMMING

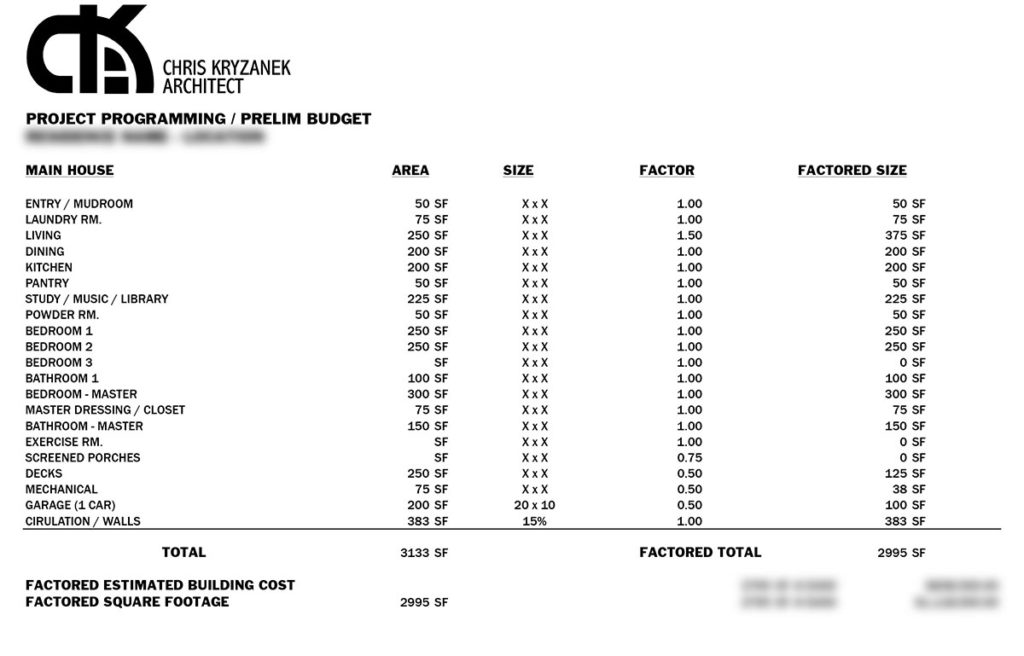
One of the key processes in the preliminary stage of design on a project is programming. Tools or techniques include lists, programming diagrams, and budgeting spreadsheets. This helps define the project and confirm that it works within the defined budget.

A good first step for most clients is listing the spaces you want. You might have general sizes of the rooms in mind, and it is fine if you do not. My custom residential survey form can assist you with this stage. This stage is a good time for you to consider how you envision your custom residence. For example, do you need a formal dining room, or is a home office more important?

Another step in the programming deals with adjacencies and proximities of these spaces. This means thinking about openness from one space to the next, or separation and privacy. Examples: bedroom proximity, home office space separation with proximity to a powder room. Laundry room separation for sound and proximity for convenience.

Early programming lists can include rough sizes for spaces that will assist with the programming budget. As these numbers are defined in the early stages of a project it helps keep client wishes in check with their budget.

Also when it comes to adjacencies and proximities, another item to factor in is the project site. Views and access to sunlight, along with noise and privacy are all important considerations.

This process is also one that goes through revisions as the project develops. All of these considerations are not typically known at the beginning of a project and are worked out through understanding clients’ needs and wants and translating them to schematic design concepts.

Next up:

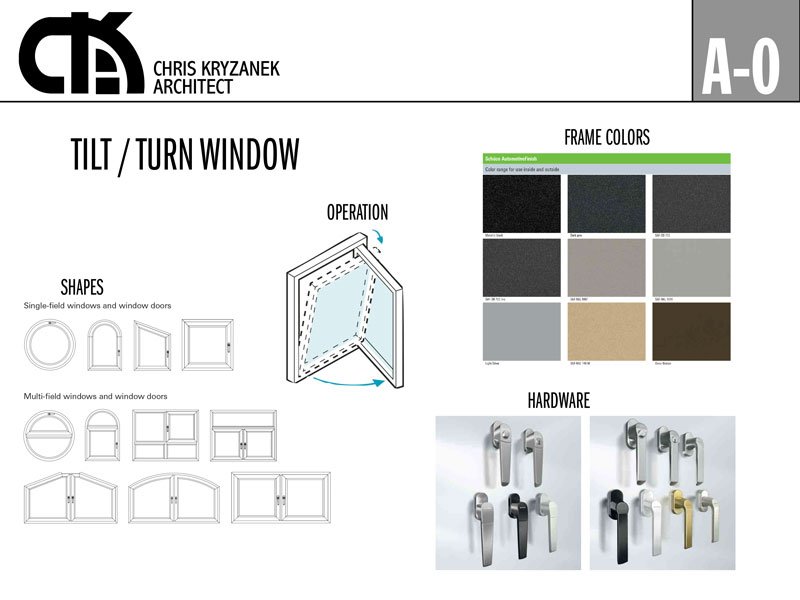
TILT/TURN WINDOWS

Tilt/Turn windows are typically used in Europe but are not as common here. So, why should you care? Let’s point out a few reasons why you should consider these windows for your custom house.

PERFORMANCE

First, because these are a European product they are produced under stricter energy codes, so high performance is expected on these windows. Triple glazing is the norm, with multiple seals on the operable units for controlling air leakage, and with thermal breaks, these windows have R-values high above typical domestic double-glazed windows. Also, because these windows are flange-less, they install differently than typical windows, but this allows for fewer shims and better air-sealing around the product. Water management is also addressed with built-in weeps.

CUSTOM

Custom sizes are expected and not an upcharge. You order what you want and it’s made to the size and shape you want. This allows you to get larger windows too. If you need storm glass, or tempered glass that is not a problem. Window hardware is also very customizable.

The material options are typically uPVC (which is an unplasticized PVC – more stable than vinyl), aluminum, and wood with cladding options. There are many color choices for aluminum cladding and color and material options for foil facing on uPVC. The finish qualities are high on the standard products and match up with higher-level products from domestic sources.

EASE OF USE & SAFETY

The Tilt/Turn function works like this. The window tilts in and opens at the top for venting and it doesn’t obscure the view. This allows for a screen on the exterior, and an open window that no child can fall through (with the addition of a sash limiter), or an intruder can get in through. The turn function allows the window to fully turn in (typically for ease of cleaning the exterior of the window from the inside – with the screen left on). Typically for egress-required locations the best domestic product available is casement windows, but tilt/turn windows open faster from the fully locked position. Robust hardware also provides multiple lock points making these much more secure when locked.

COST

Part of the process of using these European windows is to go through a domestic consultant or rep from the company. They look at your overall window design and help you make sure you are getting the best bang for your buck. Part of the overall cost is a flat-rate shipping charge that can be around $6,000. This means that this is not a source for a project only requiring a few windows. However, even with the shipping charges these windows can be feasible when high-performance windows are desired when compared to domestic windows.

Next up:

FARMHOUSE REDUX

Chris Kryzanek Architect - Farmhouse Redux intro to project site concept

Welcome to Farmhouse Redux, a remodel addition project in Clatsop County.

Addition / Remodel projects can provide additional challenges and constraints. In this series, we’ll dive into all aspects of what these types of projects can expect with the known and the unforeseen.

This introduction will outline the typical steps of the preliminary design stage. The summary will show what to expect as the series moves forward.

BIG PICTURE AKA THE PARTI

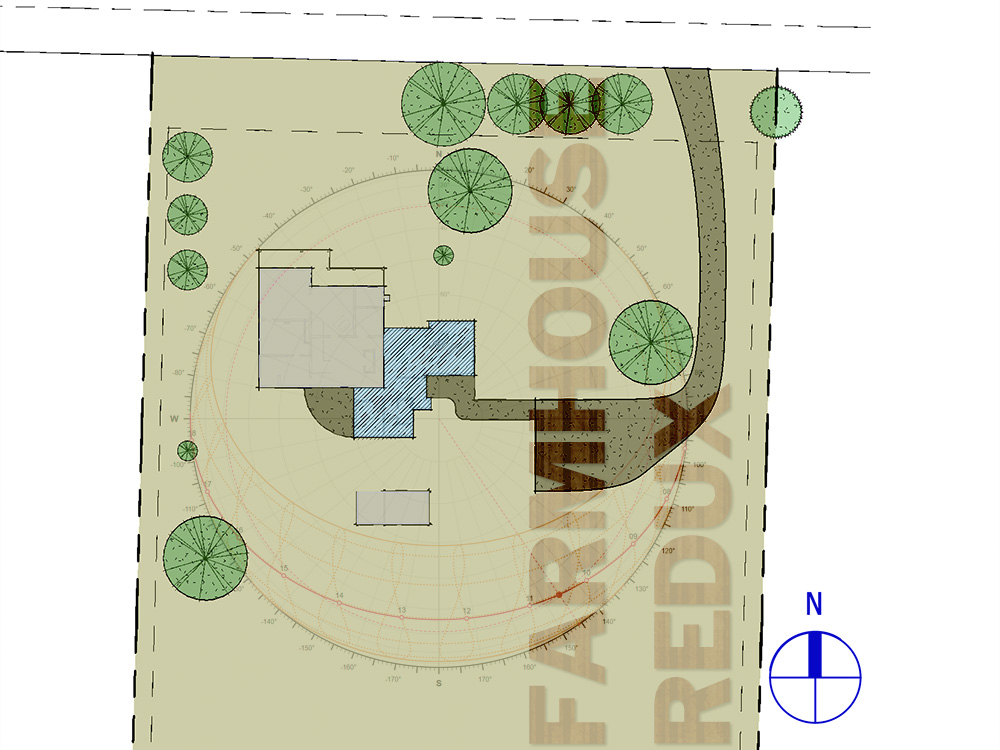
With additions, integrating into the existing design is usually expected. The addition doesn’t want to stick out or dominate over the existing (unless it’s a complete gutting or tear-down). Overall massing/roofs need to blend and not appear to be an afterthought. These factors can often limit the amount of square footage being added. Keep in mind with the sketch above that on this preliminary site plan, only the plan aspect is shown. One of the biggest challenges on this project was integrating into the existing roof for continuity while adding much-needed space.

THE SITE CONSTRAINTS AND OPPORTUNITIES

In addition to the existing building providing constraints or limitations, the site also contributes. Property lines set the stage for any site. From there, setbacks and easements provide base restrictions. Zoning and other ordinances further limit front-yard, back-yard, and side-yard setbacks and height limitations. Even further, how does the design affect the existing structural design of the original house? Where a new foundation is built, it’s easy to plan for structural loads, but with existing foundations, new loads often will require additional structure to support them.

ADDITIONAL SITE FACTORS TO CONSIDER

In addition to the previously mentioned site limitations, opportunities also exist. Is there potential for south-facing solar gain? Is there additional privacy that needs to be maintained or increased? Is the potential to create outdoor spaces possible around the addition? Some of these items will be known before the preliminary design, while some might not reveal themselves until after.

PROGRAMMING AND THE BUDGET

After the site is analyzed, the next step involves the exploration of general massing and how it relates to the program. While programming does drive the design, the previously mentioned site and existing building constraints always have to be kept in mind. At this point, it is also a key time to confirm that the budget aligns with the program. With that said, the preliminary design focuses more on the project’s overall scope, rather than the specific layout of all the rooms and the placement of doors and windows. The budget will focus on SQ FT numbers, which will be factored in, with both aspects of the project keeping each other in line.

LOOKING FORWARD AND NEXT STEPS

These steps will put this project towards the end of the preliminary stage. This is where the design will be finalized and start to move into Design Development. For now, this summary should be enough to get this series started. Welcome to this project and we hope you find it useful series.

Next up:

INTRODUCTION & THE PROCESS

Welcome to the blog of Chris Kryzanek Architect. This blog aims to break down the architectural process and hopefully remove any misconception or mystery about what it’s like to work with an architect.

First off, let’s clarify who an architect is. The architect is a licensed professional with a specifically defined legal standing and typically, a mandated role in construction.

The primary interaction in the process is between the architect and the client. In architecture, the client and architect work closely together during the programming phase (architecture jargon), when they work out the client’s specific design requirements. The program’s shape is refined during the schematic and design development phases (more jargon). During the process of document production, details of the project are defined and refined. Throughout construction, the process is defined by dealing with the eventual foreseen and unforeseen.

The previous summary of the process is the 30,000-foot view. Through this blog, we will dive deeper to get a look at the multitude of steps on a typical project. Another way to phrase it is “What to expect when you work with Chris Kryzanek Architect.”

Next up: